Recently my sister in law shared a yummy recipe for quick home made pizzas using basil pesto as the sauce. They were wonderful! So while making yummy home made calzone pizzas over the weekend I decided to try out my own pesto version. It was absolutely AMAZING! Here is the recipe! Feel free to change it to suit your taste!
Pesto calzone pizza
Ingredients:
Original Basil pesto
Rhodes dinner rolls(frozen and set out two-three hours Pryor to rise and thaw)
Garlic salt (1/4 tsp)
Mozzarella cheese (optional)
Fetta cheese (I used sun dried tomato fetta)
Shredded asiago cheese
Grated Parmesan cheese (optional)
Canadian bacon (optional, but really yummy)
Mushrooms (optional)
Tomato, diced (optional)
A few spinach leaves(also optional)
One egg, beaten
Any extra toppings you wish
First, set out your rolls on a cookie sheet, cover with a towel and let them thaw or rise for about two hours. I set mine out while I was cooking breakfast so they would be ready for lunch.
Pre-heat your oven to 350.
Grab one of your rolls and roll it out (this will be your pizza dough)
Grab a spoon and spread some of the pesto all over the "dough".
Sprinkle a little garlic over the pesto
Now place a few spinach leaves on
Next, add the Canadian bacon(or whatever other topping you choose)
Then add a couple mushrooms
Now sprinkle a little of each cheese over top....oh yeah, starting to look pretty tasty now!
Lastly. I added a few diced tomatoes.
Now fold over the dough and pinch the sides together to seal it shut. Take a fork and press down around the ends, this just helps pinch it closed so it stays sealed while baking...And it makes it look pretty!
Now take your egg and beat it, then wash over the top of the calzone, and sprinkle a little basil(or oregano)and garlic salt over top and place into heated oven. Bake for 10-15minutes or until nice and golden brown on top. Enjoy the yumminess!!!
Saturday, September 20, 2014

Monday, July 7, 2014
BLT Grilled Cheese
On my menu board today for lunch were grilled cheese sandwiches, per my daughters request. She said "mommy you NEVER EVER make us grilled cheese anymore!". So I decided to be nice and put in on the menu. The reason why I shy away from making grilled cheese is because I simply do not like to eat them. So, naturally I don't think to put it on the menu until one of my little ones asks me to.
I decided if I was going to make grilled cheese I would at least make them taste good. So naturally the first thing that popped into my head was bacon. Why? Because, obviously, bacon can make anything taste delicious! So this morning I searched my refrigerator to gather all my ingredients so I would have it all ready for lunch. I noticed I had a few tomatoes I needed to use before they went bad, I also had just a handful of asiago cheese and fetta cheese left from my pizza making last week that needed to get used. That's when he light bulb went off and I decided to pile all of these random ingredients onto my grilled cheese. The end result ended up tasting wonderful! I mostly wanted to post this here so I could remember how to make it, and of course, to share it with you all. So here is my recipe for what I call a BLT grilled cheese, even though it doesn't have lettuce in it, so really I guess it's just a BT grilled cheese. Either way, Enjoy!
Here are all the ingredients I used! Feel free to change it up and use whatever you have in the fridge!

Okay, lets get started. First open a pack of bacon, cut it in half




Here are the list of Ingredients I used:
1 pack of bacon
2 slices or Amish rye bread
A couple slices of Roma tomato
Fetta cheese
Shredded cheddar cheese
Shredded Asiago cheese
Here are all the ingredients I used! Feel free to change it up and use whatever you have in the fridge!
Okay, lets get started. First open a pack of bacon, cut it in half
Next, grab a skillet and fry your bacon on medium heat until done. Then set it to the side. Let it cool a few seconds before inhaling it while your cooking the rest of the food.
After your bacon is finished, pour out the bacon grease to re use the pan for the sandwiches. I didn't wash my pan so it left a little of the grease leftovers
Next, take your bread and butter one side of each slice
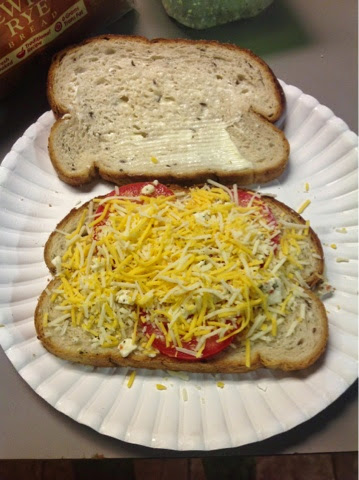
Next, flip over one piece and add a little tomato to the not buttered side
Then throw on all your cheese..mmmm
And add a little bacon
Then a few mushrooms...
And for fun how about we throw in a little basil pesto to the other slice of bread(on the not buttered side)
Now put the other slice of bread on top, both butter sides will be facing the outside
toss it in the skillet(make sure the heat is on low to give the middle of the sandwich time to heat without burning the outside)
Let it sizzle for a few minutes. Go ahead, grab a couple slices of bacon and eat it while your waiting(there is a reason I cooked the whole pack) and then gently lift the sandwhich up to check to see if the bread has browned, once it is golden brown carefully flip it over without dumping everything out into the pan
After you flip it, take your spatula and smash the sandwich down. This helps melt everything and hold it all together. Feel free to grab a couple more pieces of bacon and eat them while you wait. When both sides are golden brown and your cheese is melted then its done
Viola!! There you have it. A delicious, cheesy, bacony(is that a word?) piece of goodness. I served mine with fruit because a good serving of fruit makes anything look a little more healthy. This was amazing and I am completely stuffed! I'm drinking regular pink lemonade in the pic, but I wish I had made the very berry. Maybe for snack time later! I have the recipe posted to this blog as well.
This would also be really good with guacamole and cheddar cheese instead of the pesto and fancy cheese...that may be my next sandwhich to make!
My mind is forever changed about the grilled cheese sandwich. It's became one of my very favorite things to eat for lunch!!! I made the kids a more simple version of this, I basically just did bread, cheese and bacon. They loved it and asked for seconds.
1 pack of bacon
2 slices or Amish rye bread
A couple slices of Roma tomato
Fetta cheese
Shredded cheddar cheese
Shredded Asiago cheese
hand full of mushrooms (optional)
Tbs of real butter, softened
Basil pesto (optional)
Basil pesto (optional)
Saturday, August 3, 2013
Apple Crisp
I've been meaning to post this recipe for a long time. It is up on my list of top 10 all time favorite desserts. There are two reasons why this recipe makes the list. #1: it's really yummy #2 it's probably the easiest and fastest dessert ever. It is simple, it makes your house smell sweet and it goes great with French vanilla ice cream. So here it is. Sigh, one of these days Santa Claus will bring me a nice camera so I can jump on the band wagon and take nice pictures of the yummy food I make.

Ingredients:
6 or 7 apples (honey crisp, red delicious or pink lady. Red delicious are the best with this because they are nice and sweet)
1/2 cup of softened butter
1 cup old fashioned rolled oats
3/4 cup of flour
3/4 cup brown sugar (packed)
Cinnamon for sprinkling
Directions:
Wash, core, peel and slice the apples.
Until then, you are just going to have to go old school and read the recipe without fancy pictures ;)
Ingredients:
6 or 7 apples (honey crisp, red delicious or pink lady. Red delicious are the best with this because they are nice and sweet)
1/2 cup of softened butter
1 cup old fashioned rolled oats
3/4 cup of flour
3/4 cup brown sugar (packed)
Cinnamon for sprinkling
Directions:
Wash, core, peel and slice the apples.
Place the sliced apples into a round pie pan (I butter my pan a little first) and sprinkle the apples with plenty of cinnamon. You can use as little and much as you would like.
Now mix together the dry ingredients, and cut in the butter.
Once the mixture is all mixed up and looks like thick bread crumbs, you just pour it over the apples and spread it around. Now bake it in the oven on 350 for about 30-45 mins or until you can
stick a fork in the center and the apples are nice and tender. I just check it everyone once in a while until its done. Serve hot with a big scoop of ice cream on top!
Now mix together the dry ingredients, and cut in the butter.
Once the mixture is all mixed up and looks like thick bread crumbs, you just pour it over the apples and spread it around. Now bake it in the oven on 350 for about 30-45 mins or until you can
stick a fork in the center and the apples are nice and tender. I just check it everyone once in a while until its done. Serve hot with a big scoop of ice cream on top!
Chocolate chocolate chip cookies
Sadly, I didn't have everything to make one. So I decided to look for a good chocolate chip cookie recipe. I jumped on (well. not really jumped on. more like picked up) my trusty iPad and pulled up google. I stumbled across This recipe from non other than...*insert drum roll*...the pioneer woman! Aaah, good ol' PW. The website you look for when you are craving a dessert that is made up of butter,sugar and chocolate. Exactly what I was looking for! How lucky that her website was at the top of google under super sweet desserts ;)
Anyways, back to the cookies. The pictures looked good, and I knew since it was a PW recipe, it definitely would be rich and sweet enough to satisfy my sweet tooth (and possibly put me in a sugar coma). The cookies were wonderful( I don't think one of her her dozens of dessert recipes I've tried have failed) and my children are definitely enjoying eating them. The recipe is a keeper, so I thought I would pass it on. The only thing I did different, instead of adding white chocolate chips, I just stuck with semi sweet. Enjoy!
P.s don't forget the almost frozen milk, you will NEED it with these rich cookies!
Click here for the recipe
Heres hailey, my photogenic one (the other two messy kiddos were not liking me trying to take their picture) she sure enjoyed her cookies! She was even doing a little wiggle happy dance while eating them!

Friday, June 7, 2013
Home made spanish style rice
I love making my own Spanish style rice! This is a great recipe I use. I make a huge batch and freeze portions in zip lock baggies. Then when I'm ready to use the rice, I just thaw it out and place it in a pan on the stove top and steam it. Or you can cook it in a skillet until its heated(just add a little water or olive oil so it doesn't dry out). You can also microwave it, I have a nifty microwave steamer bowl I use when I do it that way. Regardless which way you warm it, it all pretty much comes out the same.
Enjoy!
Spanish Rice
INGREDIENTS
2 tablespoons olive oil (can use up to 1/4 cup)
1 onion, chopped fine
1 garlic clove, minced
2 cups of medium or long-grain white rice
3 cups* chicken stock (or vegetable stock if vegetarian)
1 heaping tablespoon tomato paste or 1 cup of diced fresh or cooked tomatoes, strained
Pinch of oregano
1 teaspoon salt
1/3 cup of shredded carrots, chopped fine.
*Check the instructions on the rice package for the proportions of liquid to rice. They can range from 1:1 to 2:1. If your rice calls for 2 cups of water for every cup of rice, then for this recipe, use 4 cups of stock for 2 cups of rice.*
METHOD
In a large skillet brown rice in olive oil, medium/high heat.
Add onion and garlic.
Cook onion rice mixture, stirring frequently, about 4 minutes, or until onions are softened.
In a separate sauce pan, bring stock to a simmer.
Add tomato sauce, oregano, and salt.
Add rice to broth. Bring to a simmer. Cover.
Lower heat and cook 15-25 minutes, depending on the type of rice and the instructions on the rice package.
Turn off heat and let sit for 5 minutes.
Yield: Serves 4 to 6.
Freezer tip: split rice into four ziplock bags and freeze for later! When ready to use, thaw it out and steam it, microwave it, or heat in a skillet adding a little olive oil or water if it starts to dry out.
Enjoy!
Spanish Rice
INGREDIENTS
2 tablespoons olive oil (can use up to 1/4 cup)
1 onion, chopped fine
1 garlic clove, minced
2 cups of medium or long-grain white rice
3 cups* chicken stock (or vegetable stock if vegetarian)
1 heaping tablespoon tomato paste or 1 cup of diced fresh or cooked tomatoes, strained
Pinch of oregano
1 teaspoon salt
1/3 cup of shredded carrots, chopped fine.
*Check the instructions on the rice package for the proportions of liquid to rice. They can range from 1:1 to 2:1. If your rice calls for 2 cups of water for every cup of rice, then for this recipe, use 4 cups of stock for 2 cups of rice.*
METHOD
In a large skillet brown rice in olive oil, medium/high heat.
Add onion and garlic.
Cook onion rice mixture, stirring frequently, about 4 minutes, or until onions are softened.
In a separate sauce pan, bring stock to a simmer.
Add tomato sauce, oregano, and salt.
Add rice to broth. Bring to a simmer. Cover.
Lower heat and cook 15-25 minutes, depending on the type of rice and the instructions on the rice package.
Turn off heat and let sit for 5 minutes.
Yield: Serves 4 to 6.
Freezer tip: split rice into four ziplock bags and freeze for later! When ready to use, thaw it out and steam it, microwave it, or heat in a skillet adding a little olive oil or water if it starts to dry out.
Loaded baked potato soup
This is a great recipe for baked potato soup. I am working on a home made cream of potato soup to replace the canned stuff! Enjoy!
Loaded baked potato soup
Ingredients:
4-5 yellow potatoes(peeled and diced into small squares)
2 cans cream of potato
1 batch homemade Cream of chicken
3tbs butter
2 cans chicken broth
1 sm onion, chopped
1/2 tsp salt(or to taste)
1/2 tsp pepper (or to taste)
1/2 pint half and half
1pkg thick sliced bacon, cooked and crumbled into bits
1 lb shredded cheddar cheese(thick shred)
1/2 lb Colby Monterrey jack cheese, shredded fine.
Green onion(optional)
Directions
In the crock pot, combine all ingredients accept the bacon,cheese and half and half. Cook on high 4hrs(or low 6-7hrs).
Cook your bacon and crumble, set to side. Shredd your cheese, set to side.
Cook for 4hrs or until potatoes are tender.
5 minutes before serving add half and half and stir, let sit about 5mins. Then add crumbled bacon, cheese and green onion. Stir and serve!
Loaded baked potato soup
Ingredients:
4-5 yellow potatoes(peeled and diced into small squares)
2 cans cream of potato
1 batch homemade Cream of chicken
3tbs butter
2 cans chicken broth
1 sm onion, chopped
1/2 tsp salt(or to taste)
1/2 tsp pepper (or to taste)
1/2 pint half and half
1pkg thick sliced bacon, cooked and crumbled into bits
1 lb shredded cheddar cheese(thick shred)
1/2 lb Colby Monterrey jack cheese, shredded fine.
Green onion(optional)
Directions
In the crock pot, combine all ingredients accept the bacon,cheese and half and half. Cook on high 4hrs(or low 6-7hrs).
Cook your bacon and crumble, set to side. Shredd your cheese, set to side.
Cook for 4hrs or until potatoes are tender.
5 minutes before serving add half and half and stir, let sit about 5mins. Then add crumbled bacon, cheese and green onion. Stir and serve!
Monday, May 13, 2013
Banana Nut Granola
It's no secret that I love granola. It's such a easy snack, my kids love it and so do I!
We eat it for breakfast with yogurt,or snack time by itself, or you can even put it on top your ice cream! So today I wanted to make a granola with dehydrated bananas in it. This granola does not have a real over powering banana flavor and tastes wonderful. It's also pretty healthy and contains a lot of proteins, fiber and omega 3s. If you don't have a dehydrator to make the bananas, you can find them at any whole foods market.
here ya go, enjoy!
Ingredients:
1 cup dehydrated or freeze dried bananas
1/3 cup coconut oil
1/3 cup maple syrup (100% organic maple, nothing else added)
1/2tsp sea salt
Chopped pecans or whole almonds, or both
1 cup whole flaxseed
3 cups old fashioned rolled oats
Organic, dairy free cocoa chips
Raisins
Organic crispy rice cereal(optional, but my kids like it)
1 Tsp ground cinnamon
Directions
Preheat your oven to 400 degrees.
In a small sauce pan, warm your coconut oil,cinnamon, and maple syrup on med-low heat until melted down and blended together. Turn off heat and set to the side
In a large mixing bowl, mix together oats, rice cereal, raisins,nuts and flaxseed. Next, pour your syrup over top and blend well.
Spread out your granola on a cookie sheet bake in the oven for 10-15minutes, stirring every 5 minutes or so. Watch it carefully and make sure it doesn't burn.
Take it out of the oven and let it cool completely, transfer it to a bowl and mix in cocoa chips and bananas. Store in a airtight container.
I ate mine on top of my vanilla Greek yogurt, it was SO good!
A little about the ingredients:
The maple syrup is a great natural sweetener, it Is a natural sugar that is produced from maple trees, and it gives it a great sweet flavor. It has a lot of health benefits and is better than honey or white sugar. Here is info about the benefits of using maple syrup.
The coconut oil is a really healthy substitute for butter. You can't taste the coconut at all (I hate coconut so trust me, you can't taste it) Here is info on the health benefits of coconut, it is good for your thyroid also!
Flaxseed is really good for you! Here is info about flaxseed
Almonds and pecans are a good source of protein!
Subscribe to:
Posts (Atom)